Tag: ihm academy

IHM Academy Performance Metrics Masterclass - Lesson 3

IHM Academy · Performance Metrics Masterclass – Lesson 3

Performance Metrics Masterclass – Lesson 3 : Zone Entry Efficiency & Controlled Breakout Success

By Coach Mark Lehtonen · IHM Academy

Elite teams don’t just skate fast – they move the puck through pressure with structure.
Zone entries and zone exits are the engine of modern hockey possession.
If you win these two phases, you control the game’s rhythm.

Lesson 3 walks you through the two most important possession metrics:

Performance Metrics Masterclass - Lesson 3 : Zone Entry Efficiency & Controlled Breakout Success

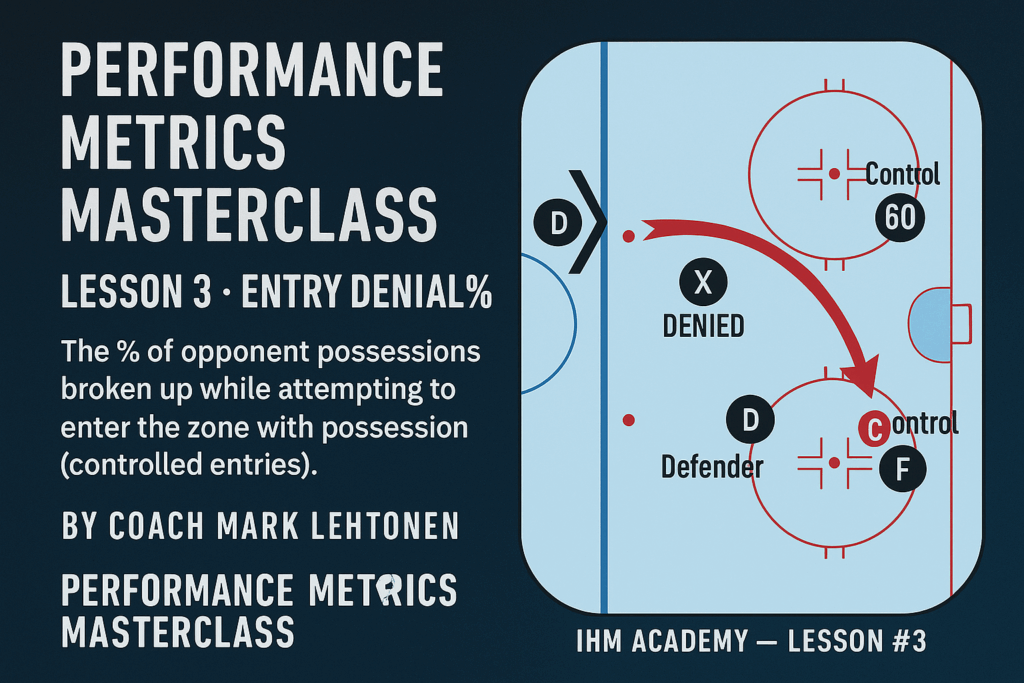
1️⃣ Controlled Zone Entries (CZE%)

A controlled entry = carrying the puck over the blue line or completing a pass to a teammate who crosses with possession.

Why it matters:
Carried or passed entries produce 3-5× more scoring chances than dump-ins.

Key components of a strong controlled entry:

Entry spacing – the puck carrier must have a passing lane AND a skating lane.

Width support – the weak-side forward stretches the gap.

Middle-lane drive – F2 pushes defenders back.

Timing – you attack when defenders’ feet are turned, not squared.

Deception – shoulder fakes, weight shifts, eye deception.

Elite players don’t attack the blue line –
they manipulate the gap until it breaks.

2️⃣ Breakout Success Rate (BO% – Controlled Exits)

A controlled breakout = exiting the defensive zone with puck control (carry or completed pass).

Why it matters:
Teams with a BO% above 48% spend significantly less time defending and generate +6-9 extra shots per game.

Core principles:

D1 escape deception – shoulder check → mislead → attack space.

D2 as a hinge – always behind play angle, never flat.

Center low support – early read, slow down to open the middle.

F1 wall timing – arrive at the boards with speed, never stationary.

F2 slash support – cut diagonally for high-percentage passing lanes.

Breakouts aren’t plays –
they’re pressure-management systems.

Entry → Exit → Entry Loop

Great teams maintain “momentum chains”:

Win breakout → controlled entry → offensive zone time → force tired defenders → repeat.

Bad teams break their own momentum by:

Throwing pucks away at the blue line

Forcing east-west passes under pressure

Using wingers standing still on the walls

Possession is not talent –
it’s structure, spacing, and timing discipline.

🧱 Summary

Zone entry efficiency = how you start the attack.
Breakout efficiency = how you survive pressure and restart the attack.
Together, they form the possession backbone of elite hockey.

💬 Coach Mark says

You don’t beat teams with rushes – you beat them with layers behind the rush.
Breakouts are chess. Entries are checkmate.

❓ Questions & Answers | IHM Performance Metrics

Q1: What is a controlled zone entry?
A1: Carrying or passing the puck over the offensive blue line with full puck control.

Q2: Why are controlled entries better than dump-ins?
A2: They generate 3-5× more scoring chances and allow immediate offensive structure.

Q3: What defines a good breakout?
A3: Clean, controlled puck exit using spacing, deception, and layered support options.

Q4: Which position is most important in breakouts?
A4: The center – their low support unlocks all passing lanes.

Q5: What is the biggest mistake during entries?
A5: Attacking defenders too early instead of manipulating the gap first.


IHM Academy - Performance Metrics Masterclass • Lesson 1

IHM Academy – Performance Metrics Masterclass • Lesson 1

IHM Academy – Performance Metrics Masterclass • Lesson 1

Performance Metrics Masterclass – Lesson 1
High-Danger Goals, Goals Above Expected, Ice Tilt, Speed Bursts and Shot Differential

Date: November 8, 2025 | Series: IHM Academy – Performance Metrics Masterclass | Lesson: 1

Welcome to Lesson 1 of the IHM Academy Performance Metrics Masterclass. This module builds a working toolkit for coaches, analysts, and ambitious players. You will learn the five metrics that most reliably explain why teams sustain form across weeks, not just nights: High-Danger Goals, Goals Above Expected, Ice Tilt, Speed Bursts and Shot Differential. We define them, show how they are built, explain how to apply them in practice, and give you pro-level checklists, drills, and a repeatable workflow.


1) High-Danger Goals (HDG)

Definition. High-Danger Goals are goals scored from areas and situations with inherently higher scoring probability due to distance, lateral puck movement, traffic, and pre-shot actions (passes across the slot, rebounds, tips). Think inner slot, net-front, and east-west seams.

Why it matters. HDG is a strong signal of repeatable offense. Teams that consistently arrive in the interior create both primary shots and second-puck chaos. It scales with playoff hockey where space is compressed.

Analyst’s rule of thumb. Sustained contenders typically land in the top third of the league in HDG share. A sudden spike in HDG without a change in slot entries or low-to-high pass rate is usually noise.

Minimal model. Mark inner slot as a polygon bounded by the goal posts extended, hashmarks, and the mid-slot dot line. Tag a shot as “high danger” if any of the following occur within 3 seconds before release: (1) Royal-road pass (across center lane), (2) rebound, (3) deflection/tip within 10 feet, or (4) release location inside inner slot.

Pro example. Ducks opening month: 28 HDG (Top-2 league). The repeatable driver was net-front layering on P1 and a weak-side crash from P3 after low-to-high. When those layers show on video and the counts rise, the signal is genuine.


2) Goals Above Expected (GAX)

Definition. GAX = Actual Goals − Sum of expected goals (xG) on each qualifying attempt. It captures finishing above or below what shot quality predicts, adjusted by context like pass type and goalie set.

Why it matters. Positive GAX over meaningful volume can indicate elite shooting, deception, or shot preparation. It also flags unsustainable runs when driven by fluke bounces without process.

Computation sketch.

For each shot i:
  xG_i = f(distance, angle, pre-shot movement, shot type, traffic, goalie lateral set)
GAX = Σ(goals_i) − Σ(xG_i)

Pro example. Cutter Gauthier +5.91 Goals Above Expected early season. The video confirms: heavy mid-range velocity, one-touch releases, and layered net-front traffic. The metric aligns with tape – the strongest validation.


3) Ice Tilt

Definition. A time-weighted territorial control proxy describing how long a team spends pushing play in the offensive half relative to the opponent, often approximated by sustained possession and controlled entries leading to attempts.

Why it matters. Ice Tilt predicts streak stability. Teams that own the first period tend to dictate matchups and draw the game into their preferred structure.

Analyst’s cue. First-period Ice Tilt advantage is a leading indicator for multi-game form. Ducks led the league in first-period tilt during their surge; their game states favored front-foot hockey and early PP opportunities.


4) Speed Bursts (20+ mph) and Max Speed

Definition. Count of discrete skates exceeding 20 mph and the single-shift maximum speed. This is not a vanity metric – it’s a proxy for separation, retrieval pressure, and threat in transition.

Use correctly. Speed is only valuable when attached to route efficiency. Bursts that end on the outside wall without inside support are empty miles.

Pro examples. Logan Cooley at 23.97 mph (No. 2 league) translates directly to controlled entries and east-west pressure. Nick Schmaltz couples above-average burst count with high total distance, indicating repeatable pace over long shifts rather than single sprints.


5) Shot Differential (5-on-5)

Definition. Team shots on goal minus shots allowed at 5v5, game-normalized. It is a sturdy backbone metric: you rarely see long winning streaks from teams living in the red here.

Pro example. Utah Mammoth at +5.4 per game (No. 2 league). That is process-level dominance and matches video of their retrieval speed and interior reloads.


Case Study A – Anaheim Ducks: Why the Breakout Holds

  • Interior creation: 28 HDG early (Top-2). Net-front layering + quick seam passes.
  • Finishing over model: Gauthier at +5.91 GAX with mid-range velocity and one-touch mechanics.
  • Game state control: Best first-period Ice Tilt; they script starts and play ahead.
  • Depth threat: Multiple PPG producers and multi-goal game frequency signaling repeatable shot prep.

Applied coaching adjustments that keep it real

  1. Keep a weak-side crash rule after low-to-high. If F3 is late, HDG collapses.
  2. Preserve the net-front box-out culture on D. Don’t sacrifice interior to chase hits.
  3. On PP1, avoid static 1-3-1. Add slot interchange to preserve east-west velocity before the shot.

Case Study B – Utah Mammoth: Speed With Structure

  • Shot volume engine: +5.4 5v5 shot differential; most games outshooting opponents.
  • High-danger finishing: Nick Schmaltz 96th percentile high-danger shots; mix of tips and seam attacks.
  • Transition threat: Logan Cooley max 23.97 mph; drives controlled entries, inside lanes, and delay-pass options.
  • Defensive workload: 2nd fewest shots against; retrieval speed plus clean exits.

Coaching guardrails

  1. Build route discipline for fast wingers: speed burst must end inside dots or on a delay cut into support.
  2. Keep D hinge timing tight; exit under pressure into middle support to maintain shot differential.
  3. Protect Schmaltz’s interior routes with F3 high so tips are not one-and-done rushes.

Player Micro-Profiles

Cutter Gauthier – Why the Model Loves Him

  • Shot quality: Heavy mid-range, minimal dusting, one-touch habits increase xG and GAX.
  • Traffic literacy: Shoots through screens, not around them.
  • Action item: Keep a pre-shot “checklist”: seam, screen, stick down, release.

Nick Schmaltz – Interior Repeatability

  • High-danger shot mix: Rebounds, tips, center-lane cuts.
  • Pace sustainability: High total distance with maintained touch quality late in shifts.
  • Action item: Two-touch finishes at net-front; practice stick angle changes within 0.3 s.

Logan Cooley – Speed That Translates

  • Max speed with endpoints: Bursts end on inside ice, not glass.
  • Entry tree: Straight attack, delay cut, or drop as first three options.
  • Action item: 3-lane entry drill with inside shoulder check before blue line.

How to Build a Repeatable Analyst Workflow (Weekly)

  1. Collect. Export shot locations, pre-shot passes, rebounds, tips, and on-ice traffic flags. Tag your inner-slot polygon once and reuse.
  2. Compute. HDG, team xG, player xG, and GAX by game and rolling 5-game windows.
  3. Context. Overlay Ice Tilt by period and game state (tied vs trailing vs leading).
  4. Speed layer. Pair 20+ mph burst counts with entry outcomes (controlled vs dump vs turnover).
  5. Synthesize. Build a one-page: Top 5 drivers, risk flags, and one coaching adjustment.
  6. Validate with tape. Metric movement without video corroboration is a yellow flag.

Practice Drills That Drive the Metrics

Drill 1 – Royal-Road into Net-Front Chaos (HDG)

Set 3 forwards vs 2 D + goalie. Start from low-to-high, weak-side pop to bumper, force a seam pass, immediate shot. F3 crashes far post. Count only if release < 1.2 s after seam.

Drill 2 – One-Touch Mid-Range Release (GAX booster)

Feeder at the dot, shooter between circles. No stickhandling allowed. Add a screen and a late stick flash from defender to simulate traffic.

Drill 3 – Three-Lane Entry Speed Tree (Bursts that matter)

Winger gets timing pass entering at 20+ mph. Options: straight drive, delay to trailer, or drop to late F3. Score only when shot originates inside dots within 4 seconds after entry.

Drill 4 – Exit Under Pressure to Middle Support (Shot Differential)

D retrieval, shoulder check, hinge, middle support to C. Add backpressure timer. Missed middle support = turnover. Track successful exits vs fails.


Red Flags and How to Fix Them

  • HDG drops but xG stays flat: You are shooting from the outside. Add low-to-high to seam, commit F3 to far post crashes.
  • GAX negative run: Shooters are dusting pucks. Install one-touch rules for mid-slot reps.
  • Poor first-period Ice Tilt: Re-script first shift matchups and first two exits. Remove risky neutral-zone stretch for 10 minutes.
  • High burst count, low entries: Speed without routes. Force inside finish options on drills.
  • Shot differential negative: Retrieval gap. Cut D-to-D rim habits, increase middle exits and short support.

Quick Reference – Bench Cards

  • Interior Rule: If the shot is outside dots with no screen, we are off plan.
  • Speed Rule: Every burst ends inside dots or into a delay cut.
  • PP Rule: No static 1-3-1 for two consecutive entries. Interchange.
  • Exit Rule: First look is middle. If closed, hinge, then middle again.

Coach Mark comment

The metrics work when the routes are honest. Interior play creates scoring truth. Speed without an inside finish is decoration. Build layers at the net, protect the middle on exits, and the numbers will follow.


Glossary

  • xG (expected goals): Probability a shot becomes a goal based on context.
  • GAX: Goals Above Expected = Goals − ΣxG.
  • Ice Tilt: Time-weighted territorial control proxy by period and game state.
  • High-Danger: Inner-slot or preceded by rebound, tip, or royal-road seam.
  • 20+ mph burst: Discrete skate exceeding 20 mph, tied to a possession outcome.

Checklist – End of Lesson 1

  1. Tag inner-slot polygon and pre-shot events in your template.
  2. Compute HDG, xG, and GAX for team and top six forwards.
  3. Log Ice Tilt by period for last five games.
  4. Pair 20+ mph bursts with entry outcomes.
  5. Publish a one-page scoreboard with one tactical change.
  6. Run Drills 1-4 twice this week; re-measure next game.

Questions & Answers | IHM Performance Metrics

Why are the Anaheim Ducks performing so well this season?

The Ducks rank near the top of the league in high-danger scoring and first-period territorial control (Ice Tilt). Their young core led by Carlsson and Gauthier drives shot volume and transition pace, while special teams and goaltending have been good enough to protect leads.

What makes Cutter Gauthier’s analytics profile elite?

Gauthier combines heavy shot volume with elite shot quality. He leads the team in Goals Above Expected, sits in the top percentiles for average shot speed and high-danger attempts, and consistently attacks through the middle lanes where shooting percentage is highest.

What is Ice Tilt and why does it matter?

Ice Tilt measures which team controls the puck and zone time over stretches of play. Strong Ice Tilt early in games predicts shot advantage and helps teams draw penalties, stack offensive zone faceoffs, and protect expected-goals leads.

How does Goals Above Expected work?

Goals Above Expected is the difference between a player’s actual goals and the model’s expected total from all of his shots after accounting for location, pre-shot movement, traffic, and goalie positioning. Positive numbers signal finishing talent or superior shot selection.

Why are the Utah Mammoth trending up in our model?

Utah pairs a strong shot differential with top-end speed and a low shots-against profile. They outshoot opponents most nights, keep attempts to the outside, and convert off the rush through Cooley, Keller, and Schmaltz.

What do high-danger goals tell us about a team?

High-danger goals indicate repeatable process: inside-lane entries, net-front presence, and east-west puck movement. Teams that win the slot consistently sustain scoring even when power-play luck cools.

How should I read shot differential per game?

Shot differential per game is a clean proxy for five-on-five puck control. Positive numbers usually pair with favorable expected-goals share and correlate with standings over larger samples.

What stands out in Nick Schmaltz’s start?

Schmaltz is producing shots from every band of the rink and sits in the mid-90th percentiles for high-danger attempts. He also adds value with deflections and interior touches on the power play.

How fast is Logan Cooley and does top speed translate to goals?

Cooley’s top speed sits near the top of the league. More importantly, he stacks frequent 20+ mph bursts that pull defenders apart and create cross-slot passes, which lift expected-goals on his line.

Are the Ducks legitimate playoff contenders based on the metrics?

Yes. With top-tier high-danger creation, strong Ice Tilt to start games, and improving five-on-five possession, their profile matches recent conference finalists rather than early-season pretenders.


IHM Academy- Learn the Game Like a Coach

IHM Academy- Learn the Game Like a Coach

IHM Academy- Learn the Game Like a Coach

IHM Academy is a professional hockey learning hub led by Coach Mark Lehtonen. Learn modern systems, structures and reads used in the NHL and top European leagues: offensive concepts, forecheck and neutral-zone tactics, special teams, and complete Defensive Zone Coverage. Each lesson includes a clear tactical breakdown, coaching language, a clean board diagram, and a cinematic banner - built to make you think like a coach and play with purpose.

Pro-level hockey academy by Coach: elite systems, special teams and D-zone coverage with clear diagrams and coach-grade explanations.

Systems Categories


Performance Metrics Master Lessons | IHM Academy

Performance Metrics Master Lessons | IHM Academy


IHM Academy - Defensive Zone Coverage

Defensive Zone Coverage


Elite Offensive Structure, Forecheck & Neutral Zone Systems

Elite Offensive Structure, Forecheck & Neutral Zone Systems


IHM ACADEMY - LESSON #4 DESIGNING OFFENSE FROM THE DRAW THE CIRCLE ATTACK SYSTEM BY COACH MARK LEHTONEN

IHM Academy - Lesson #4 By Coach Mark Lehtonen · IHM Academy

Designing Offense from the Draw - The Circle Attack

Designing Offense from the Draw - The Circle Attack

Face-offs in the offensive zone are not random battles. At the higher levels, they are scripted attacks. The Circle Attack is a set play built to generate an immediate scoring chance within seconds of winning the draw. The goal is not just to gain possession - it’s to attack with speed before the defenders can organize.

Objective

The goal of this play is to have the center win the puck backward into space so that the net-side winger can explode around the face-off circle, collect the puck in stride, and attack downhill with multiple options. This movement forces the defense to turn, chase, and react instead of defending in structure.

Roles and Timing

  • Center (C): The center’s job is not to just “win it back.” The puck must be directed to a spot, not a scramble. The ideal placement is just behind the inside hashmark of the circle, where your winger will arrive with speed.
  • Net-front winger: Starts low, near the crease. On the drop, this winger immediately loops around the top of the circle. That looping route is the heart of the play - they become the first puck carrier at full speed, not standing still on the wall.
  • Weak-side winger: Slides into soft ice high in the slot or weak side circle. This player becomes the “release valve.” If defenders collapse on the puck carrier, that weak-side forward is wide open for a one-touch shot.
  • Defensemen (D1 / D2): Hold width and stay ready on the blue line. One of them rotates middle for a potential high shot, the other stays spread to keep the PK honest. If nobody is pressured, that high option becomes a clean point shot through traffic.

Primary Reads for the Puck Carrier

  1. Drive the net: Attack the goalie immediately. If the defender is behind you, take it straight to the crease. This forces panic, rebounds, penalties, chaos - all good things for you.
  2. Feed the middle: If both defenders collapse to stop the drive, the puck carrier can hit the trailing forward in the slot. That’s often the best shot of the entire sequence: inside hashmark, goalie moving, defenders turning.
  3. Wrap and extend: If there’s no clean lane, continue behind the net. Now the team flows into a controlled offensive cycle. You didn’t lose the puck. You just turned the face-off win into set offensive zone time.

Why This Play Works

This system attacks the one moment when the defending team is weakest: right after the draw. Defenders are still tied up on sticks and bodies, the goalie’s sightlines aren’t set yet, and coverage assignments aren’t sorted. You are hitting them before they get organized.

Coaches like this play because it creates speed without requiring a risky stretch pass. All five of your skaters know their first movement before the puck even touches the ice. That’s what separates structure from chaos.

Coach Mark Lehtonen says:

“We don’t ‘hope’ to get a chance off the draw - we design one. The Circle Attack is timing, discipline, and trust. Your winger has to believe the puck is going to that spot. Your center has to put it there. That’s execution.”

Summary

The Circle Attack is how smart teams weaponize the offensive zone face-off. You’re not just winning a puck - you’re building a scoring chance in advance. When this play is timed correctly, the defense is already under pressure before they’ve even found the puck.

For more offensive design, special teams structure, and pro-level detail, explore IHM Academy. Learn hockey the way coaches teach it.


Penalty Kill Forecheck Explained - IHM Academy by Coach Mark Lehtonen

IHM Academy – Lesson #3 By Coach Mark Lehtonen

Penalty Kill Forecheck Explained

Penalty Kill Forecheck - Coaching Diagram

The penalty kill is not just about surviving. The best teams use it to control momentum, dictate entries, and steal time. A well-structured penalty kill forecheck can frustrate even elite power plays by forcing dump-ins, cutting passing options, and delaying clean possession.

The Purpose of the PK Forecheck

When a team goes short-handed, the objective is twofold – deny clean entry and force turnovers before the puck ever sets up in the zone. A strong PK forecheck disrupts the power play at its source: transition. You never let them enter with control; you make them chase the puck 200 feet.

Typical PK Forecheck Structures

1. Diamond (Passive Read)

The Diamond setup is used when protecting a lead or facing a high-skill power play. F1 pressures up ice only if the puck is loose; F2 and F3 angle toward the boards, forming the top of the diamond. The defensemen stay deeper, controlling the middle and forcing the breakout wide. This structure delays puck movement and eats up seconds – time is your best defense.

2. Wedge +1 (Aggressive Read)

The Wedge +1 is the modern standard. It combines pressure and containment. The “+1” (F1) attacks the puck carrier immediately after a turnover or dump-in, while the other three players form a compact triangle or wedge behind. The shape flexes with the play – when one pushes, the others collapse and reset the wall.

This system works because it allows one player to pressure aggressively without breaking the box. The wedge rotates as one unit; each read triggers a collective motion, not an individual chase.

Entry Denial

The penalty kill forecheck begins at the offensive blue line. F1 angles the puck toward the boards, while F2 mirrors through the middle. Both defensemen hold the red line – never backing in early. The goal is to make the puck carrier either dump the puck or send a risky lateral pass under pressure. Every second the opponent spends retrieving the puck is a small victory.

Key Coaching Points

  • Short routes, big results: Don’t chase. Skate only as far as you can force a bad pass. Short bursts win the clock.
  • Stick in lane: On the PK, your stick is your best weapon – keep it extended, take away options.
  • Stay layered: Every movement should reveal a second defender behind. Never a single line of defense.
  • Pressure with purpose: A good PK doesn’t just clear the puck – it clears with possession and exits smartly.

Coach Mark Lehtonen says:

“A penalty kill that just survives is weak. A penalty kill that pressures is dangerous. When you force them to reset three times before entry – that’s when frustration sets in. Smart pressure wins more than blocked shots.”

Summary

The Penalty Kill Forecheck is where discipline meets aggression. It’s not a passive retreat – it’s a controlled attack designed to deny comfort. When executed properly, it changes the entire rhythm of the game. The opponent might have five skaters, but you control the ice.

Learn more systems and tactics in IHM Academy – where real hockey IQ begins.


IHM Academy - Lesson #2 By Coach Mark Lehtonen · IHM Academy

2-1-2 forecheck hockey system diagram - IHM Academy by Coach Mark Lehtonen.

IHM Academy – Lesson #1 By Coach Mark Lehtonen · IHM Academy

2-1-2 Forecheck Explained

The 2-1-2 forecheck is one of hockey’s most balanced and aggressive pressure systems. It’s designed to close time and space in the offensive zone, disrupt the opponent’s breakout, and immediately convert puck recovery into scoring opportunities.

Tactical diagram of the 2-1-2 forecheck system in ice hockey, showing F1 and F2 pressure, F3 coverage, and D1/D2 rotations - IHM Academy Coaching Edition by Coach Mark Lehtonen.

Structure of the System

The formation is simple on paper: two forwards deep (F1 and F2), one high forward (F3), and two defensemen (D1 and D2) holding the blue line. But the key lies in timing, rotation, and reading the play.

F1 drives in first to pressure the puck carrier immediately after a dump-in or turnover. His job is to force a rushed decision – ideally pushing the puck toward the boards or into a contested corner. F2 reads F1’s angle and closes the nearest passing lane, supporting from the opposite side. These two create the “2” in the 2-1-2 – a synchronized wave of forecheckers working below the goal line.

F3 remains high in the slot area, between the tops of the circles. This player is the safety valve – responsible for cutting off middle-lane exits, reacting to turnovers, and covering if a defenseman pinches. If F3 drifts too low, the team loses control of the neutral zone – a classic coaching mistake even at pro level.

Defensive Support and Rotation

Behind the forwards, both defensemen stay tight at the blue line, sealing the walls. When the puck is moved up one side, D1 has the green light to pinch aggressively and force a turnover along the boards. The moment that happens, F3 must rotate back to occupy D1’s vacated position – maintaining the “2-1-2” structure. This automatic rotation is what keeps the system stable even during chaos.

D2 shades toward the middle, ready to recover loose pucks or defend quick counters. The unit as a whole constantly shifts in small, controlled motions – think of it as a living net closing around the puck carrier.

Key Coaching Concepts

  • Layered Pressure: Each forechecker attacks on a different layer, preventing clean possession or stretch passes.
  • Controlled Aggression: Pinching is encouraged – but only when support is confirmed behind.
  • Communication: Talk dictates success. Without clear calls between F2, F3, and the pinching D, the system breaks instantly.
  • Transition Readiness: When a turnover occurs, F3 and D2 immediately activate – turning defense into offense within seconds.

Coach Mark Lehtonen says:

“A perfect 2-1-2 feels like a wave – first you force, then you trap, then you attack again. The best teams don’t just chase the puck – they close the ice, one decision at a time. Discipline from F3 is what separates an organized forecheck from chaos.”

Summary

The 2-1-2 forecheck remains a cornerstone of modern hockey because it combines relentless pressure with tactical security. It can be used after controlled dumps, on offensive face-offs, or even immediately after neutral-zone turnovers. When executed with proper spacing, timing, and communication, it traps opponents, exhausts their breakout patterns, and creates sustained offensive-zone dominance.

Explore more lessons in IHM Academy – including detailed breakdowns of power-play structures, neutral-zone traps, and transition systems used by professional coaches worldwide.