Tag: Zone Entries

IHM Academy – Lesson #314: The Power-Play Drop-Pass Entry Explained

By Coach Mark Lehtonen | 24 September 2026

IHM Academy – Lesson #314: The Power-Play Drop-Pass Entry Explained

Direct answer: Using a first carrier to pull pressure before a second carrier attacks with speed. The power play should use the extra skater to create two or more simultaneous problems for four penalty killers, then attack only after the defensive shape has been moved or stretched.

What This Concept Means

This lesson focuses on the neutral zone and offensive blue line. The core principle is using a first carrier to pull pressure before a second carrier attacks with speed. It should be understood through player relationships rather than a static drawing: one player controls the puck, one threatens the middle, one stretches the weak side, one supports low or at the net, and one protects high possession.

A modern power play is strongest when the puck never becomes isolated. Every receiver should know the next two options before the puck arrives. The unit can change formation, exchange positions or attack from a different side, but it must preserve width, interior threat, low support and recovery structure.

The Five-Player Picture

Quarterback

The quarterback links both sides, changes the release angle and decides when the top penalty-kill layer has moved enough to attack. He should remain mobile and keep the puck inside a support network rather than becoming a stationary point shooter.

Strong-Side Flank

The strong-side flank controls a major decision hub. From the half wall he can attack inside, connect with the bumper, go low, return high or move the puck across. His feet and hips should stay open enough to see several lanes at once.

Weak-Side Threat

The weak-side player preserves the width of the power play. He may become a one-timer, backdoor or catch-and-release option. His patience matters because drifting toward the puck allows the penalty kill to shrink without punishment.

Bumper

The bumper occupies the interior between the high and low defenders. He should adjust by a few metres as the puck moves. Small changes in depth can turn a covered player into a one-touch relay or quick-shot option.

Net-Front and Low Support

The low player changes function with puck location. He screens when the puck is high, supports below the goal line when it is low, presents a stick for tips and attacks rebound or backdoor space when the puck crosses the zone.

The Main Reads

The most important reads are pressure from the penalty-kill forecheck, blue-line width, backpressure and the first recoverable space. Those details determine whether the next action should be carry, pass, rotate, shoot, reset or retrieve.

  • Pressure location: identify which penalty killer can influence the puck first.
  • Interior availability: the middle must remain a credible threat even when the puck stays outside.
  • Weak-side space: the far side becomes valuable after the strong side draws commitment.
  • Possession quality: clean possession allows deception; poor possession requires support first.
  • Recovery position: before a shot or risky pass, know who protects the next puck.

Step-by-Step Execution

  1. Secure the puck. The numerical advantage has no value without controlled possession.
  2. Build width and depth. Five attackers should occupy different lanes and levels.
  3. Identify the first pressure player. Make that defender move before forcing the final play.
  4. Keep one interior threat alive. Do not become a perimeter-only unit.
  5. Use the weak side after commitment. Change sides when the box or diamond has shifted.
  6. Attack with a purpose. A shot, seam pass or low play should improve the next possession even if it does not score.
  7. Recover immediately. Treat misses, blocks and rebounds as part of the same sequence.
  8. Reset if shape is lost. Rebuild the five-player advantage rather than forcing the next touch.

Creating the Advantage Before the Final Play

The final pass is rarely the first action that creates the chance. A seam opens because a defender stepped earlier. A one-timer opens because the puck spent time on the strong side. A bumper touch becomes available because the low player pulled a defender down. Elite power-play execution links these actions instead of treating them as isolated passes.

The puck carrier should ask which defender he wants to move and what space that movement will expose. This creates a repeatable decision process. If the intended defender does not move, the unit keeps possession and attacks a different layer.

Pressure Escape

Aggressive penalty kills want the receiver to hold the puck until he becomes trapped. The answer is early information. Before receiving, the player should know where pressure comes from and which teammate becomes the escape. One quick pass can turn a pressure jump into open weak-side space.

After releasing the puck, the passer should relocate. Standing still after a pressure escape allows the penalty kill to recover its shape. Moving a few metres can create a new return lane and force another defensive decision.

Using the Middle

The middle does not need to receive every possession, but it must remain dangerous. The bumper, net-front player and low support can rotate through interior space so the penalty killers cannot simply protect the outside passing lanes.

When the middle threat disappears, the box can expand toward the flanks with little risk. When the middle stays active, every outside pressure decision carries a consequence.

Side Changes and Weak-Side Timing

A side change is most effective after the strong side has attracted at least one extra defender. Moving the puck across too early may simply transfer possession from one covered player to another. Hold the weak side until the defensive structure commits, then move the puck before it can recover laterally.

The weak-side receiver should prepare feet and stick before the puck travels. A late setup wastes the time created by the pass.

Shot Selection and the Next Puck

Power-play shooting should be connected to screen, tip and rebound structure. A shot through a moving defender can be better than a harder shot into a settled block. A far-pad release may produce a useful rebound. A low shot-pass may create a deflection rather than a clean save.

The unit should know who attacks the rebound, who reads a rim, who protects a clear and who stays high. The shot is the start of the next possession battle.

Common Mistakes

  • Static positions: defenders settle into predictable lanes.
  • Five players on the perimeter: the penalty kill can defend outside without protecting the middle.
  • Forcing a seam before movement: the puck travels through established sticks.
  • Weak-side drift: the formation shrinks toward the puck.
  • No plan after a shot: the first attempt becomes an easy clear.
  • Rotation without replacement: movement damages the power play’s own spacing.

Coach Mark Teaching Cues

  • “Move them first.” Create the opening before attacking it.
  • “Middle stays alive.” Keep an interior threat on every side of possession.
  • “Know your escape.” Pressure should trigger the next support option.
  • “Weak side waits.” Do not collapse the rink before the defence commits.
  • “Shot starts retrieval.” Possession planning continues after release.

How to Teach It Without a Tactical Board

Use verbal landmarks: point, right half wall, left half wall, bumper, net front, goal line, backdoor and weak side. Ask each player to describe his relationship to the puck rather than his exact coordinate. The unit should be able to answer who is high, who is inside, who is low, who is weak side and who recovers the next puck.

Then add one pressure cue at a time. Let one penalty killer jump the half wall, then the point, then the low player. The power play must identify the escape and complete two connected actions before shooting. Add a missed or blocked shot and require a retrieval before the repetition ends.

Why This Matters in Modern Hockey

Modern penalty kills pressure higher, recover faster and use more pre-scouted triggers. Power plays therefore need role clarity rather than one rigid formation. The unit must understand why space opens and which player replaces each responsibility when the shape changes.

Using a first carrier to pull pressure before a second carrier attacks with speed. The goal is not possession for its own sake. The goal is to keep five threats connected long enough that four defenders are forced into a decision they cannot all solve.

FAQ

What is the main objective of this concept?

The objective is using a first carrier to pull pressure before a second carrier attacks with speed. It should either create a better scoring chance, move a penalty killer, improve spacing or increase the probability of recovering the next puck.

What should the puck carrier read first?

Read the nearest pressure, the interior option and the weak side. Those three reads usually reveal whether the correct next action is attack, move, hold or reset.

When should the power play reset?

Reset when support becomes flat, the puck carrier is isolated, the shape collapses or the only available play is a forced pass through established pressure.

Why is retrieval part of power-play offence?

Because a missed, blocked or saved shot often creates the next possession. Recovering that puck keeps tired penalty killers on the ice and prevents them from changing or clearing.

Can this be understood without a tactical board?

Yes. Learn the functional roles and the landmarks around the rink. If every player can explain who pressures, who supports, who threatens the middle, who stays weak side and who protects the next puck, the system can be understood without a diagram.

Key Takeaway

Using a first carrier to pull pressure before a second carrier attacks with speed. The best power plays create the scoring chance before the final pass by moving defenders, maintaining interior threat, preserving the weak side and treating every shot as the start of the next retrieval.
IHM Academy – Lesson #313: Power-Play Breakout Principles

By Coach Mark Lehtonen | 24 September 2026

IHM Academy – Lesson #313: Power-Play Breakout Principles

Direct answer: Exiting the defensive zone with connected support and controlled speed. The power play should use the extra skater to create two or more simultaneous problems for four penalty killers, then attack only after the defensive shape has been moved or stretched.

What This Concept Means

This lesson focuses on the neutral zone and offensive blue line. The core principle is exiting the defensive zone with connected support and controlled speed. It should be understood through player relationships rather than a static drawing: one player controls the puck, one threatens the middle, one stretches the weak side, one supports low or at the net, and one protects high possession.

A modern power play is strongest when the puck never becomes isolated. Every receiver should know the next two options before the puck arrives. The unit can change formation, exchange positions or attack from a different side, but it must preserve width, interior threat, low support and recovery structure.

The Five-Player Picture

Quarterback

The quarterback links both sides, changes the release angle and decides when the top penalty-kill layer has moved enough to attack. He should remain mobile and keep the puck inside a support network rather than becoming a stationary point shooter.

Strong-Side Flank

The strong-side flank controls a major decision hub. From the half wall he can attack inside, connect with the bumper, go low, return high or move the puck across. His feet and hips should stay open enough to see several lanes at once.

Weak-Side Threat

The weak-side player preserves the width of the power play. He may become a one-timer, backdoor or catch-and-release option. His patience matters because drifting toward the puck allows the penalty kill to shrink without punishment.

Bumper

The bumper occupies the interior between the high and low defenders. He should adjust by a few metres as the puck moves. Small changes in depth can turn a covered player into a one-touch relay or quick-shot option.

Net-Front and Low Support

The low player changes function with puck location. He screens when the puck is high, supports below the goal line when it is low, presents a stick for tips and attacks rebound or backdoor space when the puck crosses the zone.

The Main Reads

The most important reads are pressure from the penalty-kill forecheck, blue-line width, backpressure and the first recoverable space. Those details determine whether the next action should be carry, pass, rotate, shoot, reset or retrieve.

  • Pressure location: identify which penalty killer can influence the puck first.
  • Interior availability: the middle must remain a credible threat even when the puck stays outside.
  • Weak-side space: the far side becomes valuable after the strong side draws commitment.
  • Possession quality: clean possession allows deception; poor possession requires support first.
  • Recovery position: before a shot or risky pass, know who protects the next puck.

Step-by-Step Execution

  1. Secure the puck. The numerical advantage has no value without controlled possession.
  2. Build width and depth. Five attackers should occupy different lanes and levels.
  3. Identify the first pressure player. Make that defender move before forcing the final play.
  4. Keep one interior threat alive. Do not become a perimeter-only unit.
  5. Use the weak side after commitment. Change sides when the box or diamond has shifted.
  6. Attack with a purpose. A shot, seam pass or low play should improve the next possession even if it does not score.
  7. Recover immediately. Treat misses, blocks and rebounds as part of the same sequence.
  8. Reset if shape is lost. Rebuild the five-player advantage rather than forcing the next touch.

Creating the Advantage Before the Final Play

The final pass is rarely the first action that creates the chance. A seam opens because a defender stepped earlier. A one-timer opens because the puck spent time on the strong side. A bumper touch becomes available because the low player pulled a defender down. Elite power-play execution links these actions instead of treating them as isolated passes.

The puck carrier should ask which defender he wants to move and what space that movement will expose. This creates a repeatable decision process. If the intended defender does not move, the unit keeps possession and attacks a different layer.

Pressure Escape

Aggressive penalty kills want the receiver to hold the puck until he becomes trapped. The answer is early information. Before receiving, the player should know where pressure comes from and which teammate becomes the escape. One quick pass can turn a pressure jump into open weak-side space.

After releasing the puck, the passer should relocate. Standing still after a pressure escape allows the penalty kill to recover its shape. Moving a few metres can create a new return lane and force another defensive decision.

Using the Middle

The middle does not need to receive every possession, but it must remain dangerous. The bumper, net-front player and low support can rotate through interior space so the penalty killers cannot simply protect the outside passing lanes.

When the middle threat disappears, the box can expand toward the flanks with little risk. When the middle stays active, every outside pressure decision carries a consequence.

Side Changes and Weak-Side Timing

A side change is most effective after the strong side has attracted at least one extra defender. Moving the puck across too early may simply transfer possession from one covered player to another. Hold the weak side until the defensive structure commits, then move the puck before it can recover laterally.

The weak-side receiver should prepare feet and stick before the puck travels. A late setup wastes the time created by the pass.

Shot Selection and the Next Puck

Power-play shooting should be connected to screen, tip and rebound structure. A shot through a moving defender can be better than a harder shot into a settled block. A far-pad release may produce a useful rebound. A low shot-pass may create a deflection rather than a clean save.

The unit should know who attacks the rebound, who reads a rim, who protects a clear and who stays high. The shot is the start of the next possession battle.

Common Mistakes

  • Static positions: defenders settle into predictable lanes.
  • Five players on the perimeter: the penalty kill can defend outside without protecting the middle.
  • Forcing a seam before movement: the puck travels through established sticks.
  • Weak-side drift: the formation shrinks toward the puck.
  • No plan after a shot: the first attempt becomes an easy clear.
  • Rotation without replacement: movement damages the power play’s own spacing.

Coach Mark Teaching Cues

  • “Move them first.” Create the opening before attacking it.
  • “Middle stays alive.” Keep an interior threat on every side of possession.
  • “Know your escape.” Pressure should trigger the next support option.
  • “Weak side waits.” Do not collapse the rink before the defence commits.
  • “Shot starts retrieval.” Possession planning continues after release.

How to Teach It Without a Tactical Board

Use verbal landmarks: point, right half wall, left half wall, bumper, net front, goal line, backdoor and weak side. Ask each player to describe his relationship to the puck rather than his exact coordinate. The unit should be able to answer who is high, who is inside, who is low, who is weak side and who recovers the next puck.

Then add one pressure cue at a time. Let one penalty killer jump the half wall, then the point, then the low player. The power play must identify the escape and complete two connected actions before shooting. Add a missed or blocked shot and require a retrieval before the repetition ends.

Why This Matters in Modern Hockey

Modern penalty kills pressure higher, recover faster and use more pre-scouted triggers. Power plays therefore need role clarity rather than one rigid formation. The unit must understand why space opens and which player replaces each responsibility when the shape changes.

Exiting the defensive zone with connected support and controlled speed. The goal is not possession for its own sake. The goal is to keep five threats connected long enough that four defenders are forced into a decision they cannot all solve.

FAQ

What is the main objective of this concept?

The objective is exiting the defensive zone with connected support and controlled speed. It should either create a better scoring chance, move a penalty killer, improve spacing or increase the probability of recovering the next puck.

What should the puck carrier read first?

Read the nearest pressure, the interior option and the weak side. Those three reads usually reveal whether the correct next action is attack, move, hold or reset.

When should the power play reset?

Reset when support becomes flat, the puck carrier is isolated, the shape collapses or the only available play is a forced pass through established pressure.

Why is retrieval part of power-play offence?

Because a missed, blocked or saved shot often creates the next possession. Recovering that puck keeps tired penalty killers on the ice and prevents them from changing or clearing.

Can this be understood without a tactical board?

Yes. Learn the functional roles and the landmarks around the rink. If every player can explain who pressures, who supports, who threatens the middle, who stays weak side and who protects the next puck, the system can be understood without a diagram.

Key Takeaway

Exiting the defensive zone with connected support and controlled speed. The best power plays create the scoring chance before the final pass by moving defenders, maintaining interior threat, preserving the weak side and treating every shot as the start of the next retrieval.
What Are Zone Entries in Hockey? | IHM

IHM Knowledge Center

What Are Zone Entries in Hockey?

What are zone entries in hockey, and why do coaches and analysts consider them one of the most important indicators of offensive success?

Editor: Coach Mark • Updated: June 12, 2026

Short Answer

Zone entries are the methods teams use to move the puck from the neutral zone into the offensive zone. Successful zone entries help teams establish possession, create scoring opportunities, and generate offensive pressure.

Full Explanation

Every offensive attack must eventually enter the offensive zone.

How a team accomplishes this often determines whether the possession becomes dangerous or ends quickly.

Zone entries are a fundamental component of transition offense and modern hockey tactics.

Teams that consistently enter the offensive zone with purpose tend to create more sustained pressure and higher-quality chances.

Poor entries frequently result in turnovers and immediate defensive transitions.

Why Zone Entries Matter

Zone entries are far more important than many fans realize.

Research and video analysis have repeatedly shown that successful entries strongly correlate with offensive production.

Effective entries can:

  • Increase offensive-zone possession time
  • Create immediate scoring opportunities
  • Improve shot quality
  • Force defenders to retreat
  • Generate sustained offensive pressure

A team that struggles to enter the zone cleanly often struggles to attack consistently.

Common Types of Zone Entries

Teams use several methods to gain the offensive zone.

  • Controlled entries: Carrying or passing the puck into the zone while maintaining possession.
  • Dump-ins: Sending the puck deep and attempting to recover it through forechecking pressure.
  • Chip entries: Deflecting the puck past defenders into available space.
  • Stretch entries: Using long passes to attack quickly through the neutral zone.

Different situations require different approaches.

The best teams adapt rather than relying on a single entry method.

Zone Entries and Transition Offense

Zone entries represent the bridge between transition play and offensive-zone execution.

A strong transition attack allows teams to:

  • Attack with speed
  • Exploit defensive gaps
  • Create odd-man situations
  • Generate rush opportunities
  • Maintain possession under pressure

Without successful entries, even talented offensive teams may struggle to establish rhythm.

NHL vs IIHF Zone Entry Trends

Zone entry principles exist at every level of hockey.

However, rink dimensions influence tactical choices.

NHL teams often rely on speed and quick support due to smaller ice surfaces.

IIHF teams may use wider attacks and more lateral puck movement because of larger international rinks.

Regardless of league, entering the zone efficiently remains a critical offensive objective.

Why Zone Entries Create Debate

Few tactical subjects create more discussion among analysts than zone entries.

Some coaches prefer safe dump-ins that establish forechecking pressure.

Others prioritize controlled entries whenever possible.

Supporters of controlled entries highlight:

  • Higher possession rates
  • Better scoring chances
  • Improved shot quality

Supporters of dump-ins emphasize:

  • Reduced turnover risk at the blue line
  • Physical pressure
  • Forechecking opportunities

The ideal strategy often depends on personnel and game context.

Edge Case: The Failed Blue-Line Play

One difficult situation occurs when an attacker attempts an aggressive zone entry against a defender with excellent gap control.

If the puck carrier forces the play:

  • The puck may be turned over immediately
  • The attack may lose structure
  • The defending team may launch a counterattack

Elite players constantly evaluate whether to carry the puck, chip it deep, or delay the attack.

Decision-making is often more important than pure skill.

IHM Signal System: How to Read Zone Entries

When evaluating zone entries, focus on these signals:

  • Speed signal: Is the attack entering with momentum?
  • Support signal: Are passing options available?
  • Gap signal: How aggressively are defenders challenging the entry?
  • Possession signal: Is the puck retained after entry?
  • Pressure signal: Can the attack generate immediate offensive threats?

Trigger-level rule:

If a team enters the offensive zone with speed, support, and possession, sustained offensive pressure becomes significantly more likely.

Successful entries often determine the quality of the entire attack.

IHM Insight: Why Zone Entries Are Misunderstood

Many fans only remember the final shot.

Coaches often focus on how the play began.

A dangerous scoring chance frequently starts with a smart entry decision made several seconds earlier.

Likewise, a failed attack may be traced back to a poor entry attempt rather than poor finishing.

The quality of an offensive possession often depends on how effectively the zone was entered.

Mini Q&A

What are zone entries in hockey?
Zone entries are the methods teams use to move the puck into the offensive zone.

Why are zone entries important?
They strongly influence possession, pressure, and scoring opportunities.

What is a controlled entry?
It is entering the zone while maintaining possession of the puck.

Are dump-ins considered zone entries?
Yes. Dump-ins are one of the most common entry methods.

Do NHL teams track zone entries?
Yes. Many teams and analysts use zone-entry data to evaluate offensive performance.

Why This Concept Exists

Zone entries exist because teams cannot generate offense without first establishing the attack inside the offensive zone.

The ability to transition effectively through the neutral zone and gain entry under pressure has become one of the defining characteristics of successful modern offenses.

Strong entries create opportunities before the puck ever reaches the scoring area.

Key Takeaways

  • Zone entries move the puck into the offensive zone
  • Successful entries improve offensive production
  • Controlled entries and dump-ins are the most common methods
  • Support and speed heavily influence entry success
  • Decision-making matters as much as skill
  • Modern teams closely analyze zone-entry efficiency

What Is a Neutral-Zone Trap in Hockey? | IHM

IHM Knowledge Center

What Is a Neutral-Zone Trap in Hockey?

How do teams slow down fast opponents before they even enter the offensive zone, and why is the neutral zone trap so difficult to break?

Editor: Coach Mark • Updated: April 19, 2026

Short Answer

A neutral-zone trap is a defensive system where players are positioned in the neutral zone to block passing lanes, limit speed, and force turnovers before the opponent can enter the offensive zone.

Full Explanation

The neutral zone trap is designed to control the middle of the ice and prevent clean zone entries. Instead of pressuring deep, teams set up a structured formation that slows the game down.

The system focuses on:

  • Clogging passing lanes
  • Forcing dump-ins instead of controlled entries
  • Reducing speed through the neutral zone
  • Creating turnovers for counterattacks

It is a control-based system, not a pressure-based one.

The 1-2-2 Trap Structure

The most common neutral-zone trap is the 1-2-2 formation:

  • 1 forward applies light pressure on the puck carrier
  • 2 players form a line across the neutral zone to block passing lanes
  • 2 defensemen stay deeper to protect against breakouts

This structure creates a layered defense that is difficult to penetrate.

How the Trap Disrupts Offense

The trap forces the attacking team into uncomfortable decisions:

  • Carrying the puck becomes risky
  • Passing lanes are limited
  • Speed is reduced

As a result, teams are often forced to dump the puck into the offensive zone, giving up possession.

Trap vs Aggressive Forecheck

The neutral-zone trap is often compared to aggressive forechecking systems.

Trap: Focuses on control, positioning, and forcing mistakes.

Aggressive forecheck: Focuses on pressure and puck retrieval deep in the offensive zone.

Each system reflects a different coaching philosophy.

Why These Decisions Are Controversial

The neutral-zone trap is one of the most controversial systems in hockey.

Criticism includes:

  • Slowing down the game
  • Reducing offensive creativity
  • Making games less entertaining

However, it is highly effective, especially against faster or more skilled opponents.

Edge Case: Breaking the Trap with Speed

A key edge case occurs when teams attempt to break the trap using speed.

This requires:

  • Quick puck movement
  • Support from multiple players
  • Timing and spacing

If executed correctly, teams can bypass the trap and create odd-man rushes.

If executed poorly, they turn the puck over immediately.

IHM Signal System: Reading the Trap

To recognize a neutral-zone trap, focus on these signals:

  • Layer signal: Are players positioned in lines across the ice?
  • Pressure signal: Is pressure light or aggressive?
  • Lane signal: Are passing lanes closed?

Trigger-level rule:

If the attacking team is forced into dump-ins repeatedly, the trap is working effectively.

IHM Insight: Why the Trap Still Works

Despite rule changes and faster gameplay, the trap remains effective because it targets fundamental weaknesses in puck control and spacing.

It forces teams to make decisions under pressure without giving them space to execute clean plays.

Even elite offensive teams struggle against well-executed trap systems.

Mini Q&A

What is a neutral-zone trap?
It is a defensive system used to control the neutral zone.

What is the most common trap formation?
The 1-2-2 formation.

Why is it effective?
It limits speed and blocks passing lanes.

How do teams beat the trap?
With speed, quick passing, and support.

Why is it controversial?
Because it slows the game down.

Why This Rule Exists

The neutral-zone trap exists as a tactical option that allows teams to control tempo and neutralize stronger opponents through structure and discipline.

Key Takeaways

  • The trap controls the neutral zone and limits speed
  • 1-2-2 is the most common structure
  • It forces dump-ins and turnovers
  • It prioritizes control over pressure
  • Execution determines effectiveness
Performance Metrics Masterclass - Lesson 4: Zone Entries, Exits & Transition Speed

IHM Academy · Performance Metrics Masterclass – Lesson 4

Performance Metrics Masterclass – Lesson 4: Zone Entries, Exits & Transition Speed

By Coach Mark Lehtonen · IHM Academy

In today’s game, puck possession isn’t won in the offensive zone – it’s won in transition.
Neutral-zone efficiency determines who dictates pace.
Controlled entries create offense; clean exits prevent momentum swings.
Transition speed is the glue that connects both.

Zone entries, exits, and transition speed are three of the most predictive metrics of scoring chances. They measure how quickly a team moves the puck from defense to offense, how efficiently it crosses blue lines, and how much control it maintains through these sequences. NHL analytics departments track these numbers obsessively – and for a reason.

You don’t need 60% possession to win.
You need to be faster and cleaner in the moments that create possession.


🎯 Primary Objectives

  • Convert defensive stops into possession-driven exits
  • Create controlled entries that evolve into structured attacks
  • Reduce “stall points” and slow recoveries in the neutral zone
  • Build predictable support layers during every transition
  • Measure individual and team contribution to puck-movement efficiency

This is where raw skating meets tactical intelligence.


🧠 Key Concepts

1. Controlled Exits

Clean exits = clean attacks.
Teams with high controlled exit percentages generate nearly double the expected goals per entry.

Indicators of elite exits:

  • First support option is available within 2 seconds
  • D-man does NOT rim unless under heavy pressure
  • Center connects low to provide a safety valve
  • Weak-side winger anticipates the release lane
  • No “dead stops” behind the net

If you break out slow, you enter slow.

2. Controlled Entries

Possession entries lead to:
✔ zone time
✔ shot quality
✔ sustained pressure
✔ layered attacks

Dump-ins can be useful, but controlled entries consistently produce higher xG.

Attributes of high-value entries:

  • Forward enters with speed
  • At least two passing options cross the line together
  • Weak-side forward is already inside the zone
  • Defenders are forced to back-off, not gap up

Entries with speed collapse defensive structure instantly.

3. Transition Speed

Transition speed is NOT raw skating speed.
It’s decision speed + support speed.

Measures include:

  • Time from turnover → first controlled pass
  • Time from DZ recovery → neutral zone possession
  • Length of “transition sequences”
  • Layer spacing during attacks

Transition speed reveals how “connected” the team is.


🧩 Role Breakdown

Defensemen

  • Quick first read
  • Middle-first philosophy
  • Avoid long holds unless resetting structure
  • Precision in early puck touches

Centers

  • Primary transition engine
  • Must be below the puck on exits, above it on entries
  • Best neutral-zone “spine” on the roster

Wingers

  • Anticipate lanes, not react to them
  • Stretch D on entries
  • Collapse to middle for exits
  • Support north-south flow

🔧 Metrics & What They Mean

  • Controlled Exit % → how often possession starts clean
  • Controlled Entry % → chance creation predictor
  • Transition Speed (sec) → tempo and decision-making
  • Regroup Turnover Rate → efficiency under pressure
  • Entry Denial % (defense) → defensive transition impact

These are the numbers that win playoff series.


💬 Coach Mark Lehtonen says

Transition isn’t about being fast – it’s about being connected.
Slow teams are disconnected teams.

If your exits are bad, your entries will be bad.
If your entries are bad, your offense will be bad.
The game starts in the zone you leave.


❌ Common Mistakes

MistakeConsequence
Wingers fly too highNo support → forced dump
Center late on exitDefense stuck under pressure
D-man rimming too earlyTurnovers + lost possession
Slow neutral-zone regroupOpponent resets structure
Entry without layersOne-and-done attacks

🧪 Micro-Drills

  • 3-Lane Transition Relay - timing & lane discipline
  • D→C→W Exit Triangle - quick-support sequencing
  • Regroup Pressure Drill - fast decisions under squeeze
  • Controlled Entry Timing Series - layered attack entry

🧱 Summary

Zone entries, zone exits, and transition speed are the heartbeat of modern hockey.
If your team wins the transition game, you control pace, space, and momentum.

You don’t need elite talent to transition well.
You need structure, timing, and support that never dies.


❓ Questions & Answers | IHM Performance Metrics

What is a controlled zone exit?

A controlled zone exit is when a team leaves the defensive zone with possession, usually through a clean D→C→W sequence or a stretch option. It predicts stronger offensive transitions.

Why do controlled entries matter?

Because controlled entries create better shot locations, longer possessions, and higher expected goals compared to dump-and-chase plays.

How do you measure transition speed?

Transition speed is measured by timing how quickly a team moves from puck recovery to neutral-zone possession or from the neutral zone into a controlled entry.

What hurts transition the most?

Late support, long hesitation with the puck, poor lane timing, and a slow center on exits are the biggest killers of transition tempo.

What is the role of the center in transition?

The center acts as the primary support engine – low on exits, high on entries, creating constant connection between defense and forwards.


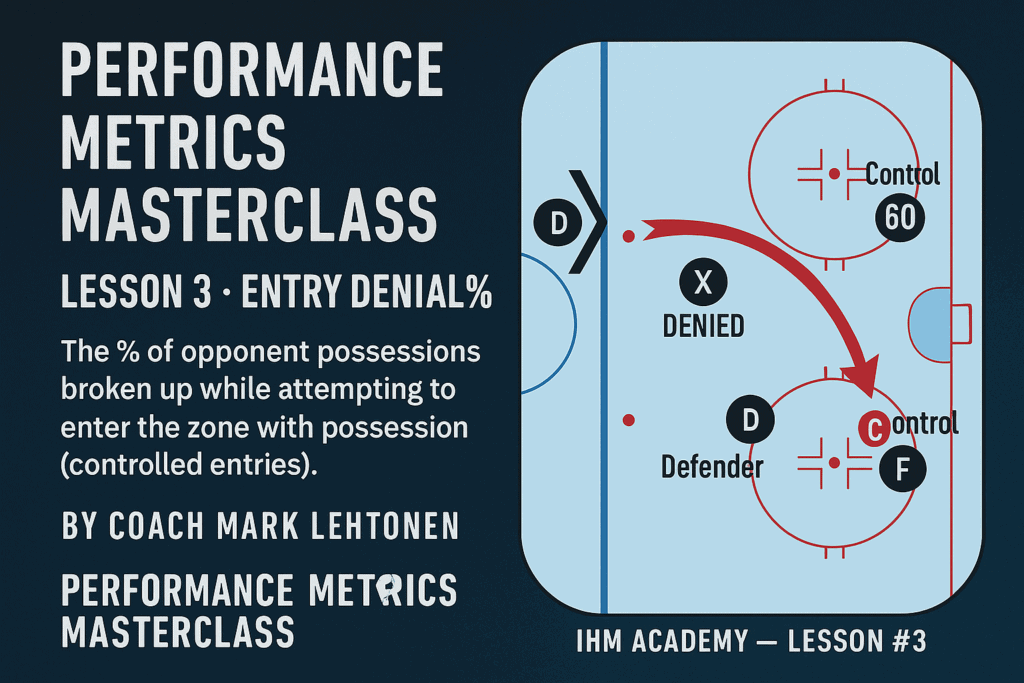
IHM Academy Performance Metrics Masterclass - Lesson 3

IHM Academy · Performance Metrics Masterclass – Lesson 3

Performance Metrics Masterclass – Lesson 3 : Zone Entry Efficiency & Controlled Breakout Success

By Coach Mark Lehtonen · IHM Academy

Elite teams don’t just skate fast – they move the puck through pressure with structure.
Zone entries and zone exits are the engine of modern hockey possession.
If you win these two phases, you control the game’s rhythm.

Lesson 3 walks you through the two most important possession metrics:

Performance Metrics Masterclass - Lesson 3 : Zone Entry Efficiency & Controlled Breakout Success

1️⃣ Controlled Zone Entries (CZE%)

A controlled entry = carrying the puck over the blue line or completing a pass to a teammate who crosses with possession.

Why it matters:
Carried or passed entries produce 3-5× more scoring chances than dump-ins.

Key components of a strong controlled entry:

Entry spacing – the puck carrier must have a passing lane AND a skating lane.

Width support – the weak-side forward stretches the gap.

Middle-lane drive – F2 pushes defenders back.

Timing – you attack when defenders’ feet are turned, not squared.

Deception – shoulder fakes, weight shifts, eye deception.

Elite players don’t attack the blue line –
they manipulate the gap until it breaks.

2️⃣ Breakout Success Rate (BO% – Controlled Exits)

A controlled breakout = exiting the defensive zone with puck control (carry or completed pass).

Why it matters:
Teams with a BO% above 48% spend significantly less time defending and generate +6-9 extra shots per game.

Core principles:

D1 escape deception – shoulder check → mislead → attack space.

D2 as a hinge – always behind play angle, never flat.

Center low support – early read, slow down to open the middle.

F1 wall timing – arrive at the boards with speed, never stationary.

F2 slash support – cut diagonally for high-percentage passing lanes.

Breakouts aren’t plays –
they’re pressure-management systems.

Entry → Exit → Entry Loop

Great teams maintain “momentum chains”:

Win breakout → controlled entry → offensive zone time → force tired defenders → repeat.

Bad teams break their own momentum by:

Throwing pucks away at the blue line

Forcing east-west passes under pressure

Using wingers standing still on the walls

Possession is not talent –
it’s structure, spacing, and timing discipline.

🧱 Summary

Zone entry efficiency = how you start the attack.
Breakout efficiency = how you survive pressure and restart the attack.
Together, they form the possession backbone of elite hockey.

💬 Coach Mark says

You don’t beat teams with rushes – you beat them with layers behind the rush.
Breakouts are chess. Entries are checkmate.

❓ Questions & Answers | IHM Performance Metrics

Q1: What is a controlled zone entry?
A1: Carrying or passing the puck over the offensive blue line with full puck control.

Q2: Why are controlled entries better than dump-ins?
A2: They generate 3-5× more scoring chances and allow immediate offensive structure.

Q3: What defines a good breakout?
A3: Clean, controlled puck exit using spacing, deception, and layered support options.

Q4: Which position is most important in breakouts?
A4: The center – their low support unlocks all passing lanes.

Q5: What is the biggest mistake during entries?
A5: Attacking defenders too early instead of manipulating the gap first.