Tag: hockey systems

What Is a Breakout in Hockey? | IHM

IHM Knowledge Center

What Is a Breakout in Hockey?

How do teams move the puck out of their defensive zone under pressure, and why does a clean breakout often determine the success of the entire attack?

Editor: Coach Mark • Updated: April 19, 2026

Short Answer

A breakout is a structured play used to move the puck from the defensive zone to the neutral zone while maintaining possession and transitioning into offense.

Full Explanation

A breakout begins when a team gains control of the puck in its defensive zone. The objective is to exit the zone cleanly and start an organized attack.

Breakouts are critical because they determine whether a team can:

Poor breakouts often lead to turnovers and extended defensive pressure.

Main Breakout Types

There are several common breakout strategies:

D-to-D breakout: Defensemen pass across the ice to shift pressure before moving the puck forward.

Reverse breakout: The puck carrier moves behind the net and passes to the opposite side to avoid pressure.

Stretch pass breakout: A long pass targets a forward positioned high to create a quick transition.

Quick up breakout: A fast pass is made immediately to a winger along the boards.

Each type is used based on pressure and positioning.

Breakout Under Pressure

Effective breakouts depend on decision-making under pressure.

Key factors include:

  • Puck support from forwards
  • Communication between defensemen
  • Timing of movement
  • Reading the forecheck

Teams must adapt their breakout strategy depending on how aggressively the opponent forechecks.

Breakout vs Forecheck Systems

Breakouts are directly influenced by the opposing forecheck.

For example:

  • Against a 2-1-2 forecheck, teams may use quick reverses
  • Against a 1-2-2, teams may rely on controlled puck movement
  • Against aggressive pressure, stretch passes may be used

The ability to adjust breakout strategy is a key tactical advantage.

Why These Decisions Are Controversial

Breakouts are often criticized when they fail.

Common complaints include:

  • Turnovers in the defensive zone
  • Overcomplicated passing sequences
  • Failure to clear the puck safely

Fans may expect simple clears, but controlled breakouts are usually more effective in the long term.

Edge Case: Failed Breakout Leading to Turnover

A critical edge case occurs when a breakout fails under pressure.

This can happen due to:

  • Slow decision-making
  • Poor positioning
  • Lack of support

Failed breakouts often result in immediate scoring chances for the opponent.

This is one of the most dangerous moments in hockey.

IHM Signal System: Reading the Breakout

To analyze a breakout in real time, focus on these signals:

  • Support signal: Are teammates available for passes?
  • Pressure signal: How aggressive is the forecheck?
  • Lane signal: Are passing lanes open or closed?

Trigger-level rule:

If a team exits the zone with control and speed, it significantly increases the chance of creating an offensive opportunity.

IHM Insight: Why Breakouts Decide Games

Breakouts are one of the most important phases of hockey.

They connect defense and offense.

Teams that execute clean breakouts:

  • Spend less time defending
  • Control the pace of the game
  • Create more structured attacks

Poor breakout teams are constantly under pressure and struggle to generate offense.

Mini Q&A

What is a breakout in hockey?
It is a play used to exit the defensive zone with control.

Why are breakouts important?
They transition the game from defense to offense.

What is a D-to-D breakout?
A pass between defensemen to shift pressure.

What is a stretch pass?
A long pass to a forward for quick transition.

What happens if a breakout fails?
It often leads to scoring chances against.

Why This Rule Exists

Breakout systems exist to provide structured and efficient ways to exit the defensive zone while minimizing risk and maximizing offensive potential.

Key Takeaways

  • Breakouts connect defense and offense
  • Different strategies adapt to pressure
  • Support and timing are critical
  • Failed breakouts are highly dangerous
  • Clean exits create offensive opportunities
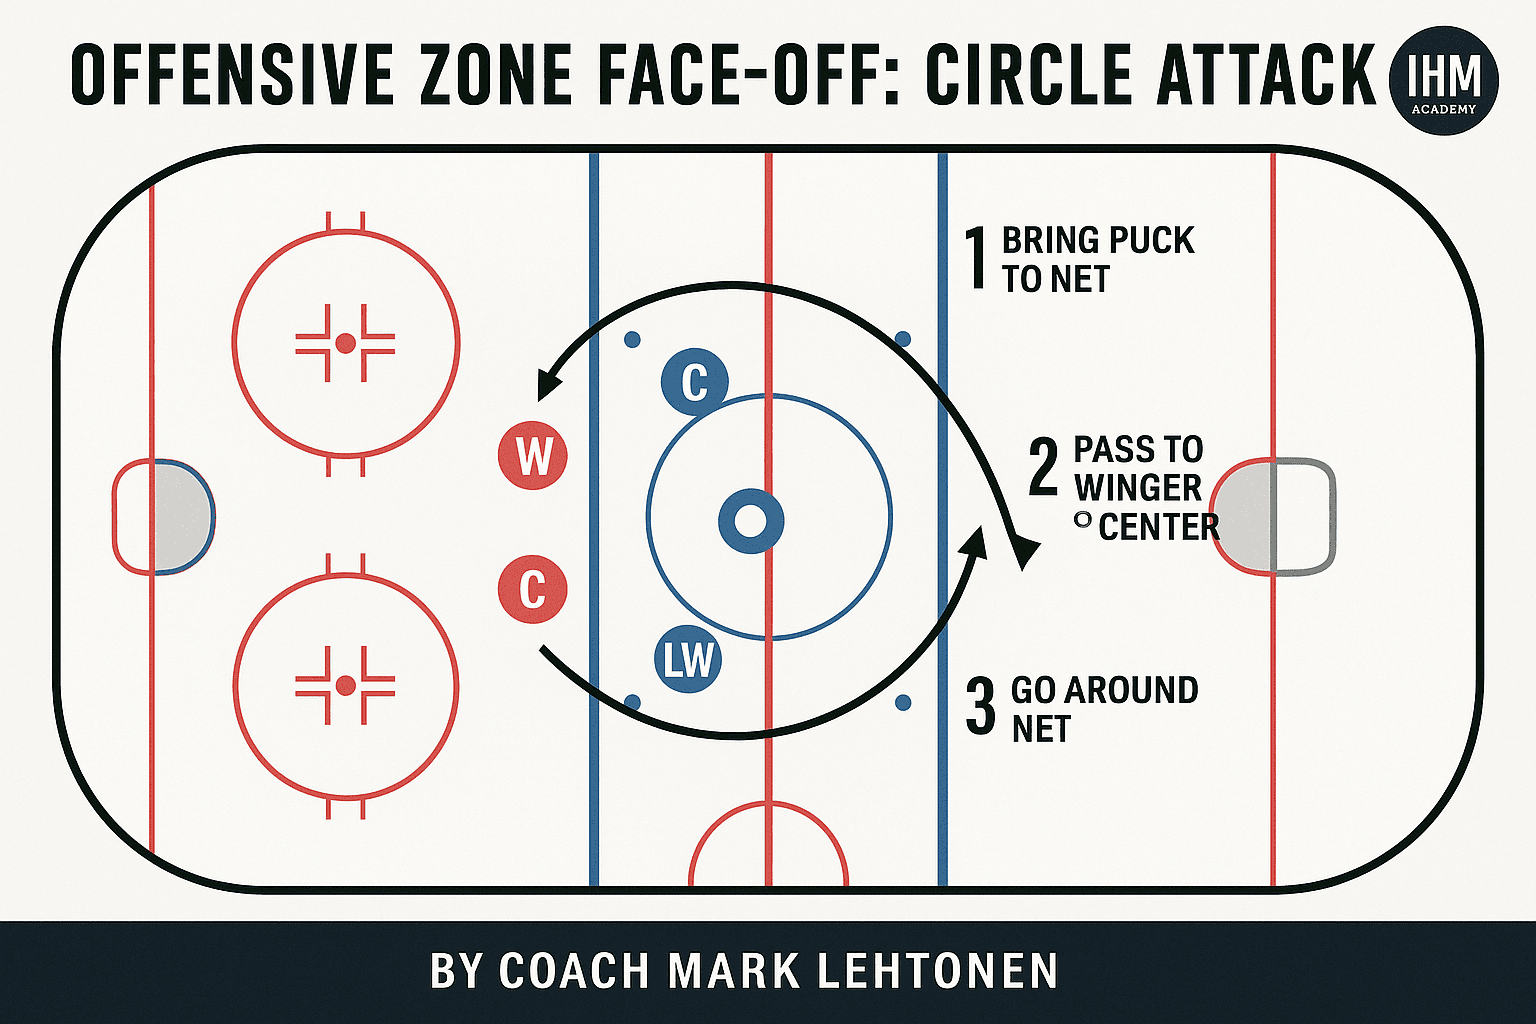
IHM ACADEMY - LESSON #4 DESIGNING OFFENSE FROM THE DRAW THE CIRCLE ATTACK SYSTEM BY COACH MARK LEHTONEN

IHM Academy - Lesson #4 By Coach Mark Lehtonen · IHM Academy

Designing Offense from the Draw - The Circle Attack

Designing Offense from the Draw - The Circle Attack

Face-offs in the offensive zone are not random battles. At the higher levels, they are scripted attacks. The Circle Attack is a set play built to generate an immediate scoring chance within seconds of winning the draw. The goal is not just to gain possession - it’s to attack with speed before the defenders can organize.

Objective

The goal of this play is to have the center win the puck backward into space so that the net-side winger can explode around the face-off circle, collect the puck in stride, and attack downhill with multiple options. This movement forces the defense to turn, chase, and react instead of defending in structure.

Roles and Timing

  • Center (C): The center’s job is not to just “win it back.” The puck must be directed to a spot, not a scramble. The ideal placement is just behind the inside hashmark of the circle, where your winger will arrive with speed.
  • Net-front winger: Starts low, near the crease. On the drop, this winger immediately loops around the top of the circle. That looping route is the heart of the play - they become the first puck carrier at full speed, not standing still on the wall.
  • Weak-side winger: Slides into soft ice high in the slot or weak side circle. This player becomes the “release valve.” If defenders collapse on the puck carrier, that weak-side forward is wide open for a one-touch shot.
  • Defensemen (D1 / D2): Hold width and stay ready on the blue line. One of them rotates middle for a potential high shot, the other stays spread to keep the PK honest. If nobody is pressured, that high option becomes a clean point shot through traffic.

Primary Reads for the Puck Carrier

  1. Drive the net: Attack the goalie immediately. If the defender is behind you, take it straight to the crease. This forces panic, rebounds, penalties, chaos - all good things for you.
  2. Feed the middle: If both defenders collapse to stop the drive, the puck carrier can hit the trailing forward in the slot. That’s often the best shot of the entire sequence: inside hashmark, goalie moving, defenders turning.
  3. Wrap and extend: If there’s no clean lane, continue behind the net. Now the team flows into a controlled offensive cycle. You didn’t lose the puck. You just turned the face-off win into set offensive zone time.

Why This Play Works

This system attacks the one moment when the defending team is weakest: right after the draw. Defenders are still tied up on sticks and bodies, the goalie’s sightlines aren’t set yet, and coverage assignments aren’t sorted. You are hitting them before they get organized.

Coaches like this play because it creates speed without requiring a risky stretch pass. All five of your skaters know their first movement before the puck even touches the ice. That’s what separates structure from chaos.

Coach Mark Lehtonen says:

“We don’t ‘hope’ to get a chance off the draw - we design one. The Circle Attack is timing, discipline, and trust. Your winger has to believe the puck is going to that spot. Your center has to put it there. That’s execution.”

Summary

The Circle Attack is how smart teams weaponize the offensive zone face-off. You’re not just winning a puck - you’re building a scoring chance in advance. When this play is timed correctly, the defense is already under pressure before they’ve even found the puck.

For more offensive design, special teams structure, and pro-level detail, explore IHM Academy. Learn hockey the way coaches teach it.


Penalty Kill Forecheck Explained - IHM Academy by Coach Mark Lehtonen

IHM Academy – Lesson #3 By Coach Mark Lehtonen

Penalty Kill Forecheck Explained

Penalty Kill Forecheck - Coaching Diagram

The penalty kill is not just about surviving. The best teams use it to control momentum, dictate entries, and steal time. A well-structured penalty kill forecheck can frustrate even elite power plays by forcing dump-ins, cutting passing options, and delaying clean possession.

The Purpose of the PK Forecheck

When a team goes short-handed, the objective is twofold – deny clean entry and force turnovers before the puck ever sets up in the zone. A strong PK forecheck disrupts the power play at its source: transition. You never let them enter with control; you make them chase the puck 200 feet.

Typical PK Forecheck Structures

1. Diamond (Passive Read)

The Diamond setup is used when protecting a lead or facing a high-skill power play. F1 pressures up ice only if the puck is loose; F2 and F3 angle toward the boards, forming the top of the diamond. The defensemen stay deeper, controlling the middle and forcing the breakout wide. This structure delays puck movement and eats up seconds – time is your best defense.

2. Wedge +1 (Aggressive Read)

The Wedge +1 is the modern standard. It combines pressure and containment. The “+1” (F1) attacks the puck carrier immediately after a turnover or dump-in, while the other three players form a compact triangle or wedge behind. The shape flexes with the play – when one pushes, the others collapse and reset the wall.

This system works because it allows one player to pressure aggressively without breaking the box. The wedge rotates as one unit; each read triggers a collective motion, not an individual chase.

Entry Denial

The penalty kill forecheck begins at the offensive blue line. F1 angles the puck toward the boards, while F2 mirrors through the middle. Both defensemen hold the red line – never backing in early. The goal is to make the puck carrier either dump the puck or send a risky lateral pass under pressure. Every second the opponent spends retrieving the puck is a small victory.

Key Coaching Points

  • Short routes, big results: Don’t chase. Skate only as far as you can force a bad pass. Short bursts win the clock.
  • Stick in lane: On the PK, your stick is your best weapon – keep it extended, take away options.
  • Stay layered: Every movement should reveal a second defender behind. Never a single line of defense.
  • Pressure with purpose: A good PK doesn’t just clear the puck – it clears with possession and exits smartly.

Coach Mark Lehtonen says:

“A penalty kill that just survives is weak. A penalty kill that pressures is dangerous. When you force them to reset three times before entry – that’s when frustration sets in. Smart pressure wins more than blocked shots.”

Summary

The Penalty Kill Forecheck is where discipline meets aggression. It’s not a passive retreat – it’s a controlled attack designed to deny comfort. When executed properly, it changes the entire rhythm of the game. The opponent might have five skaters, but you control the ice.

Learn more systems and tactics in IHM Academy – where real hockey IQ begins.


IHM Academy - Lesson #2 By Coach Mark Lehtonen · IHM Academy

Elite Offensive Structure, Forecheck & Neutral Zone Systems

Elite Offensive Structure, Forecheck & Neutral Zone Systems

Elite Offensive Structure, Forecheck & Neutral Zone Systems

A complete pro-level module covering modern offensive structure, forechecking systems, neutral-zone tactics, transition principles, and elite special teams concepts. All lessons are authored in the signature style of Coach Mark Lehtonen for the IHM Academy.


IHM Academy - Lesson #11 · By Coach Mark Lehtonen


Cinematic hockey banner of an east-west deceptive cycle with metallic IHM Academy Lesson #10 title

IHM Academy - Lesson #10 · By Coach Mark Lehtonen


Cinematic hockey banner showing a neutral-zone turnover exploding into counter-attack, with metallic title IHM Academy - Lesson #9

IHM Academy - Lesson #9 · By Coach Mark Lehtonen


IHM Academy - Lesson #8 By Coach Mark Lehtonen


IHM Academy - Lesson #7 Neutral Zone Face-Off Win - Lane Activation & Speed Release

IHM Academy - Lesson #7 By Coach Mark Lehtonen


IHM Academy - Lesson #6 By Coach Mark Lehtonen


Backchecking vs. 2-on-1 - Defensive Recovery Principles | IHM Academy (Coach Mark Lehtonen)

IHM Academy - Lesson #5 · By Coach Mark Lehtonen

IHM ACADEMY - LESSON #4 DESIGNING OFFENSE FROM THE DRAW THE CIRCLE ATTACK SYSTEM BY COACH MARK LEHTONEN

IHM Academy - Lesson #4 By Coach Mark Lehtonen


IHM Academy – Lesson #3 By Coach Mark Lehtonen


HM Academy - Lesson #2’ and ‘Neutral Zone Forecheck · 1-2-2’.By Coach Mark Lehtonen

IHM Academy - Lesson #2 By Coach Mark Lehtonen


2-1-2 forecheck hockey system diagram - IHM Academy by Coach Mark Lehtonen.

IHM Academy - Lesson #1 By Coach Mark Lehtonen