Tag: Defensive Structure

IHM Academy · Defensive Zone Coverage-Lesson #2

IHM Academy · Defensive Zone Coverage-Lesson #2

Low-Zone Rotation & Switch Coverage

Elite defensive teams don’t chase they rotate. In the low zone, the puck moves quickly below the dots, the cycle attempts to drag defenders out of position, and the net becomes exposed when coverage breaks. Low-Zone Rotation & Switch Coverage is the pro solution: we keep inside position, pass off checks at the right time, and rotate as a unit so the slot stays protected while pressure remains active.
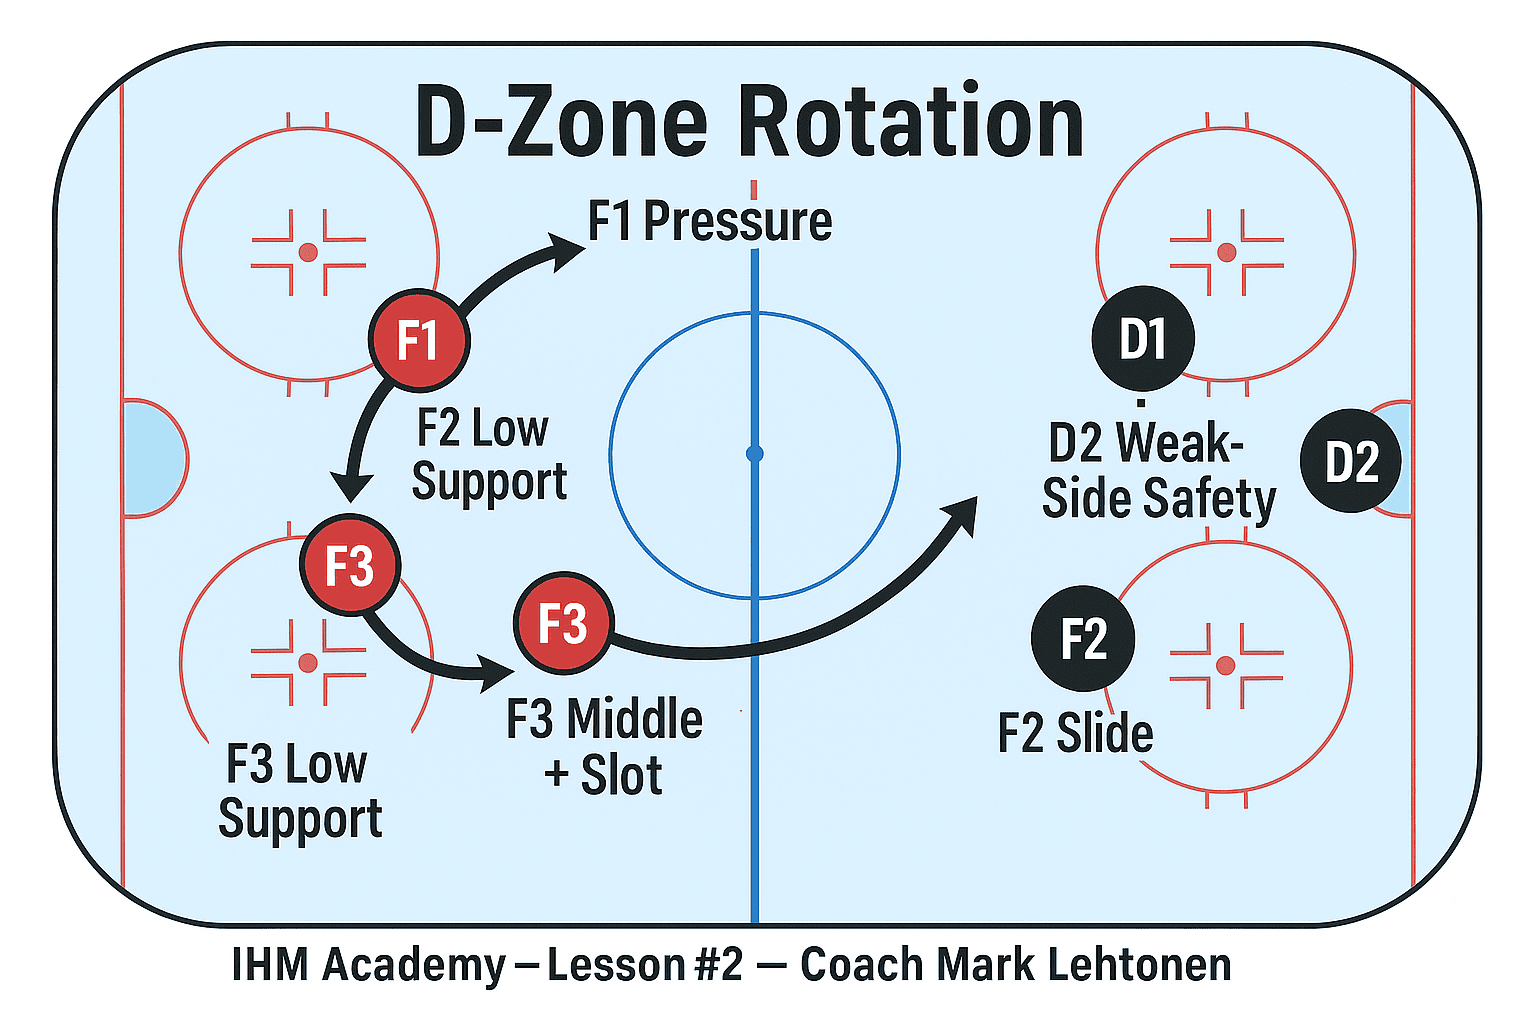
Defensive hockey diagram showing Low-Zone Rotation & Switch Coverage: D1 net-side, D2 strong-side corner pressure with F1 support, early switch behind the net, F2 sealing low-to-high, F3 anchoring weak-side inside dots; arrows illustrate ride-and-release and 5-man rotation.

🎯 Objective

  • Maintain inside body position and protect the slot at all times.
  • Apply controlled pressure on the puck without losing structure.
  • Use clean, early switches to avoid pick plays and chase patterns.
  • Rotate as a 5-man unit so gaps stay tight and lanes stay closed.

🧠 Core Principles

  • Inside first: body between man and net; sticks denying the middle.
  • Strong-side overload, weak-side anchor: pressure where the puck is, stability where it isn’t.
  • Talk early: switches are called, not guessed. “Mine / Yours / Switch”.
  • Skate through the hand-off: one defender arrives before the other leaves.
  • Head on a swivel: scan net-front every 1-2 seconds during rotations.

🧩 Roles in the Low Zone

D1 – Net-Side Defender

  • Own the crease side; box out; tie up sticks.
  • Primary communicator for switches below the hashmarks.
  • If the puck reverses behind the net, bump responsibility to the next defender and reset inside.

D2 – Corner/Strong-Side Defender

  • First contact on the cycle; steer plays outside the dots.
  • When puck is chipped past, ride and release to F1 or D1 on the call.
  • Never chase behind the net without a clear switch cue.

F1 – Low Support (+1)

  • Help close the strong-side wall; create 2v1 pressure with D2.
  • On reverse or pop, arrive first to eliminate time.
  • Reload to the top of the box when puck exits the corner.

F2 – Strong-Side High

  • Seal the strong-side point and deny low-to-high outlets.
  • Collapse to hashmarks when puck drops below the goal line.
  • First stick in the high seam on any slot threat.

F3 – Weak-Side High (Anchor)

  • Hold middle ice; protect backdoor and far-post seam.
  • Tracks the weak-side winger drifting into the slot.
  • First outlet on recovery: middle support for clean exit.

🔁 Switch Rules (Low-Zone Hand-Offs)

  1. Call it early: “Switch!” as the puck carrier crosses the back of the net or hits a pick/pinch point.
  2. Arrive before release: receiving defender must have inside position before the original checker lets go.
  3. Inside over speed: never cross outside the dots to chase – take the inside lane and meet.
  4. Net-front priority: if in doubt, don’t switch off net-front without coverage.
  5. Immediate reset: after switch, scan and rebuild the box; do not watch the puck.

📣 Bench/On-Ice Communication

  • “Hold / Switch / Bump” – universal triggers for all five players.
  • “Middle!” – F3 call identifying slot or back-post threat.
  • “Low-High!” – warning about a low-to-high play; F2 steps up.

❌ Common Mistakes

MistakeWhy it breaks coverage
Late or silent switchBoth chase; slot opens; free net-front touch
D2 chases behind the netLoss of strong-side, easy wrap or jam
F1 doesn’t reloadTop of box empty → high slot shot
Weak-side collapse by F3Backdoor seam available
No inside body on hand-offAttacker beats switch to the net

🧪 Micro-Drills

  • 2v2 Corner Cycle → Switch – D2 engages, F1 supports, call early switch behind net; D1 restores net-front.
  • Reverse Read Series – coach rims/reverses; team practices ride-and-release with inside lanes.
  • Low-to-High Denial – F2 seals point; on kick out, recover to box and block high seam.

🧱 Summary

Low-Zone Rotation & Switch Coverage keeps the puck to the outside, denies the slot, and shuts down the cycle without panic. We don’t chase-we pass off, we rotate, and we reset with five players connected inside the dots.

Coach Mark Lehtonen
Low-zone defense fails when players chase. It wins when players rotate. You don’t defend the puck – you defend the middle. If the slot stays protected, everything else becomes a battle we can live with.


❓ Q&A – Low-Zone Rotation & Switch Coverage

Q1: What is the main purpose of low-zone rotation?

A: To maintain inside positioning while applying pressure without chasing. Rotation keeps defenders connected, preserves the slot, and eliminates openings created by the cycle.

Q2: When should a switch be called below the goal line?

A: Early – as the puck carrier crosses behind the net or approaches a pick-point. Late switches create two-man chases and expose the middle.

Q3: Who initiates most low-zone switches?

A: D1 (net-side defender). D1 controls crease coverage and usually has the clearest view of incoming threats, reverses, and pick plays.

Q4: What is the biggest mistake forwards make in this system?

A: F1 failing to reload to the top of the box. When F1 stays too deep, the high slot becomes open for a shot or seam attack.

Q5: What is the weak-side forward’s primary job?

A: F3 protects the middle lane and far-post threat. F3 should never collapse without purpose – his job is to eliminate backdoor options.

Q6: How do you avoid getting picked or screened during switches?

A: Take inside routes, keep your stick pointed at the middle, and communicate early. “Inside first, body second” prevents attackers from using picks to create separation.

Q7: When does D2 join pressure instead of holding position?

A: Only when the puck is firmly on the strong-side and F3 has the middle lane sealed. If D2 jumps early, the weak side collapses and opens a backdoor threat.

Q8: What should the team do immediately after a successful switch?

A: Reset the box shape and scan. Players often relax after a switch – but the danger usually comes from the next play, not the first one.


IHM Academy D-Zone Box +1 Structure

IHM Academy · Defensive Zone Coverage-Lesson #1

D-Zone Box +1 Structure

D-Zone Box +1 is a foundational, pro-level defensive structure used across the NHL and top European leagues. It delivers stability, spatial control, and clear roles-the three pillars of elite team defense. Four players form a compact box that protects the slot, while a fifth player-the +1 pressure forward-applies controlled pressure to the puck, steering play to the boards and out of dangerous ice.

D-Zone Box +1 Structure

🎯 Primary Objective

  • Protect the slot first (inside positioning beats everything).
  • Force the opponent to play the perimeter under pressure.
  • Create turnovers through smart, directed pressure.
  • Convert stops into clean exits the instant we win possession.

When the structure holds, we control danger. When it breaks, the opponent controls tempo.

🧠 Structure: Roles & Responsibilities

D1 – Net-Side Defense

  • Own the near-post lane and body-position inside the attacker.
  • Neutralize sticks at the crease; deny tips and rebounds.
  • Shoulders square to the slot; eyes through traffic.

D2 – Weak-Side Defense

  • Stay slightly higher and inside-ready to guard backdoor.
  • Support D1’s net battle; protect middle-lane seams.
  • First look on recovery: middle support → quick up or reverse.

F1 – Pressure Forward (+1)

  • Apply controlled pressure to the puck carrier (stick on puck, body on hands).
  • Steer play into the corner/boards; never over-pursue behind the net.
  • As puck moves below or across, reload back into the top of the box.

F2 – Strong-Side Top

  • Hold the strong-side top of the box; protect high lane and point.
  • Support F1 to create 2v1 pressure without collapsing the middle.
  • Stick in lanes; body inside the dot line.

F3 – Weak-Side High

  • Anchor the middle of the box-inside dots.
  • Deny diagonal seam; read backdoor threats.
  • Be first out when we win the puck (middle support for exit).

🔧 Key Coaching Cues

  • Inside first. Win inside body position before you chase the puck.
  • Sticks in lanes. Blades angled to deny seams and middle kicks.
  • Feet under you. Short, efficient steps-no lunges.
  • Box shrinks when puck goes low. Tighten toward the crease.
  • Don’t over-pursue. Pressure with structure; one presses, four protect.

📣 Coach Mark Lehtonen says

Bad defense is chaos.
Good defense is discipline.
Elite defense is structure + pressure.

❌ Common Mistakes

MistakeConsequence
F1 chases too deep below the goal lineOpens high ice and diagonal seams
D1 loses inside net-front positionUncontested tips/rebounds in the crease
F3 sinks too lowMiddle seam re-opens; slot shots
D2 ignores weak-side threatBackdoor becomes available
Box doesn’t shrink when puck goes lowSpace near the net → breakdowns

🧪 Micro-Drills

  • 2v2 Net-Front Box-Out – inside body, tie up sticks, eyes through traffic.
  • Corner Pressure Trap – F1 angle + F2 seal; turnover → quick middle exit.
  • Low-to-High Read – box tightens low; recover to points with sticks in lanes.

🧱 Summary

Box +1 is simple, stable, and scalable. It protects the house, creates turnovers through controlled pressure, and converts stops into clean exits. Master this structure and everything else in Defensive Zone Coverage stacks naturally on top of it: low-zone rotation, switch/no-switch rules, overload defense, and rapid recoveries.

IHM Academy - Defensive Zone Coverage

IHM Academy – Defensive Zone Coverage

Defensive Zone Coverage

Welcome to the IHM Academy Defensive Zone Coverage module – a complete pro-level guide to modern NHL and European defensive structures. Here we break down rotations, responsibilities, pressure rules, net-front battles, low support, switch triggers, weak-side reads, and the tactical details that separate elite defensive teams from average ones. All lessons are authored in the signature style of Coach Mark Lehtonen.


  • IHM Academy · Defensive Zone Coverage-Lesson 6

    IHM Academy · Defensive Zone Coverage-Lesson 6

    By Coach Mark Lehtonen · IHM Academy · Defensive Zone Coverage IHM Academy – Defensive Zone Coverage · Lesson #6Weak-Side Awareness & Backdoor Protection The weak side decides games. Teams defend well on the puck side because it’s visible, loud, and instinctive. But goals are scored behind your structure – on delayed seams, weak-side pinches,…

  • IHM Academy · Defensive Zone Coverage-Lesson 5

    IHM Academy · Defensive Zone Coverage-Lesson 5

    IHM Academy – Defensive Zone Coverage · Lesson #5D-Zone Faceoff Coverage & Responsibilities Defensive-zone faceoffs decide momentum, possession, and scoring chances. A single blown assignment can turn a harmless draw into a Grade-A chance against. Elite teams treat D-zone faceoffs as structured mini-systems, with fixed roles, predictable rotations, and non-negotiable responsibilities. You don’t react in…

  • IHM Academy · Defensive Zone Coverage-Lesson 4

    IHM Academy · Defensive Zone Coverage-Lesson 4

    By Coach Mark Lehtonen · IHM Academy · Defensive Zone Coverage IHM Academy – Defensive Zone Coverage · Lesson 4: Net-Front Defense & Slot Protection The defensive zone does not break first on the boards – it breaks in the slot. Teams that lose the middle of the ice give up screens, tips, and rebounds…


IHM Academy · Defensive Zone Coverage-Lesson #3


IHM Academy · Defensive Zone Coverage-Lesson #2

IHM Academy · Defensive Zone Coverage-Lesson #2


IHM Academy D-Zone Box +1 Structure

IHM Academy · Defensive Zone Coverage-Lesson #1